Friday, August 17, 2012

Ribbon! Ribbon! Ribbon!

now read that title again inserting Jan's voice from the Brady Bunch saying "Martha Martha Martha!"

(So my design tips blog seemed to get the most hits so far so I'm going to indulge in another)

My obsession with ribbon started my senior year. We had just moved into a new house that prior summer and I was redecorating my room with more intention and creativity than I ever had before. With my sister's help we transformed vaulted ceilings and a dark bathroom into a bright and cheerful teen room.


ok so here is the only picture I could find that gave any glimpse of the room! but oh that bright purple man did I love it and my dad of course didn't just paint it purple but added depth and dimension to it by layering on some lilacs and pink ( have I ever mentioned I have the most amazing dad ever!) 

So anyways with this room started my ribbon experimentation. My favorite thing I did was hang ribbon at the threshold of my in suite bathroom door.. inspired by those wooden bead curtains from the 70's and 80's (btw I totally think we should bring them back- in a new classy way of course, but I'll save that one for later).

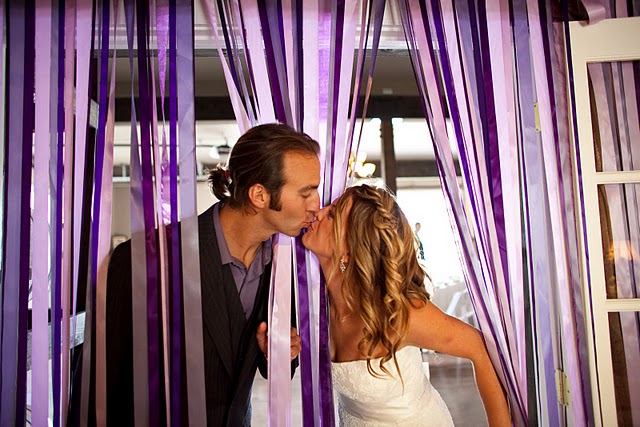
Mine looked a lot like this(minus the kissing newlyweds):


All I did was tape a strip of that double sided foam tape at the top of the molding and stuck the precut strips of ribbon on it. It was super easy and since it wasn't a major walkway the only time they ever got pulled down was if I tripped on my way into the bathroom. I found a few pictures of people who had tied the ribbon to a rod that they then placed above the threshold with brackets. You could also use an adjustable shower curtain for the same stability but it would have to be in a threshold without a door and in my opinion looks a little tacky. I like the clean, how did they do that look! And if that's not enough to convince you... tape is much much cheaper!

You know you love this!


another great way I found to hang from a dowel instead of tying, decorative clips!


So here are a few other clever ways to use ribbon around the home:

1. Shower Curtain!!! 


This shower curtain used to be made by Garnet Hill but why not make it yourself! If you are super crafty you can sew and grommet your own header for the rings to go in and the ribbon to hang by. But if that idea intimidates you could easily take an old shower curtain or an ugly one on clearance at Ross and cut everything but the header off (make sure the color goes well with your ribbon colors). Then, with some care, begin sewing your ribbon onto that strip leaving about a quarter inch on the backside. Yes it won't look as beautiful when you are taking a shower, but the clear plastic curtain should help with that!

2. On the Wall!

I recently, out of desperation to bring some quick color to my master bedroom and draw the eye onto the wall and away from the clunky old dusty TV that sits on our dresser, tried this one. I'd just get rid of the TV but for the few times we've turned on CMT music on a saturday morning, those memories of cuddling I wouldn't trade for anything. But back to the wall. So in my ditch effort I was considering hanging my jewelry as decoration from horizontal ribbon or wire on the wall (great idea btw. I currently have a small frame with fabric behind and ribbon and wire hung horizontally to hang my necklaces). So I decided to do a test run to determine the ribbons strength. All I found in my box that wasn't purple was a very thin, maybe quarter inch mauve ribbon... blahhh but like I said I was desperate! So anyways I hung it by thumb tacks first on the maybe 5 foot span and immediately saw it wasn't going to work. But wait! I liked that! And so I hung a few more and created two stripes before I ran out of ribbon. Ha this is my life's home decorating story! Hopefully I can get out and get some ribbon I actually like and finish my project!

Here is an embarrassing picture of what I have so far.. but you'll be amazed how well it does the trick.. I can't wait to get different ribbon and bring some real color to the wall (my husband asked when he got home if I was going to paint those stripes or was I just leaving the ribbon :/ )


Vertical stripes are great too! These stripes are made using electrical tape- which is supposed to not pull paint off or leave marks but I'd be a little afraid of that black smudge it likes to leave when it heats up and seals... soooo why not do it with ribbon. A whole wall may take a little time to get it all even and straight but a few yards of ribbon and some half inch nails will transform your room!


3. Curtains (indoor and outdoor)

If you are using curtains to merely be decorative why not use ribbon. Cheap, easy, and custom! All you need is a curtain rod and tie each ribbon to the top then hang or swag as you would normally. This idea is not only for a kids room!

Check out these images:


4. Canopy

When I moved away for college I took that same ribbon with me. I updated my wall color to a teal tinted Robbins egg blue (the secondary color in my old room). But this time I hung the ribbon from the center of the head of my bed out to either side.. I would have loved if it had hung down all the way to the floor but I was using what I had. 

Here are a few pictures of others canopies

I like this idea for hanging from a dining table chandelier 


5. On Accessories

Everyone has seen this one, but it doesn't down grade its glory. Ribbon on a lamp shade!


Don't be afraid to try ribbon out to trim other things up... 

To put a few ideas out there: 
  -put ribbon along the inside trim of a door- instead of paint
  -wrap ribbon around a pedestal or leg of a piece of furniture
  -wrap ribbon around a column
  -create molding like squared framing *


The Ideas are endless but now's your turn as my brain is just about fried ;)

"And that's the news from lake Wobegon where all the women are strong, all the men are good-looking, and all the children are above average."

Thursday, August 16, 2012

Starting a new season with my little boy...

I am so excited about this age with my son. At 18 months he is, to my excitement, able to play and interact more. While he still cannot understand everything I am saying he can at least enjoy more hands on activities, which I am all about!

I've been looking around for ideas for a while now of things to do with my toddler besides sit on the floor and play with the same old toys over and over again. I bore easily and get antsy just stacking blocks for my child to knock over. But for the past year or so I stuck it out for the love of being a mom. But enough is enough already and now that his attention span is longer and his understanding is growing every day and probably most importantly he doesn't put everything in his mouth, or at least obeys when I say No, I am going to work on showing him something fun or creative every day we don't have outings, which can be pretty often :)

So anyways in my web travels I came across a lot of stuff one however is notable, another blogger and you can check out her site that will overload your brain with ideas! http://mommasfunworld.blogspot.com/

I can't wait to continue to explore the world more with my son.

Today we took it easy and used what I knew I already had in the house.. we made PLAYDOUGH :)

I looked around and found a few recipes and choose this one because it had the least ingredients and I had sufficient supply of them too. I read that the cooked ones last the longest so kinda ruled out any that weren't because I live by the words "waste not want not".

The recipe I used is as follows:

     1 c. baking soda
     1/2 c. cornstarch
     3/4 c. water

     sift all ingredients, cook over medium heat in sauce pan, add food coloring, cool and enjoy


(next time, just for tryings sake, I am going to try another recipe that is supposed to last at least 3 months. It calls for 3 c. flour, 1 1/2 c. salt, 6 tsp cream of tarter, 3 TBS oil, and 3 c. water)


ok so we've got all our ingredients! (I cut the recipe cause I had never made it before)
and now we sift.. I added the sifting as the recipe said to make sure there were no clumps and well this seemed easier.

then we added the water and put it on the stove to cook. 


and my son tried to wait patiently and then started playing with the "sifter"


ooops I almost forgot to watch the pot, taking pictures of his cuteness.... starting to thicken.

ok so we've got a nice consistency and I didn't burn it! yeah! Divided it into two and added two drops of neon food coloring to each.  

and I mixed it in with my hands after folding in the majority of the liquid with a spoon ( so I didn't end up with blue hands :) )


 And I hardly had them both in the containers before he was reaching for them.


For a minute there it had been so long since I played with playdough that I forgot what to do. LOL, but then it all started coming back to me. We used cookie cutters and frosting dispensers and knives and forks but his favorite thing to do was to tear it into little pieces. He put it in his mouth a few times but after getting a lick and me saying no he got the idea!


It left a nice film on our hands but was still a lot of fun!


Some of our creations... Ephraim made these cut outs himself.. I just lifted them out. (might I mention after over an hour until he finally let me put it away)


and I made Ephraim a dog which he played with till his leg fell off then he tore him apart :)


Sunday, August 12, 2012

To Settle or Not to Settle.

Since I moved to the West coast of Florida, from the Orlando area, exactly 7 years ago I have struggled with making this area my home. Always longing to be somewhere else I didn't commit to friendships or favorite parks or even paint colors. My goal was always to finish school and then get out of here! Ha! Really I can't believe I am still surprised when God shows me he has other plans for my life.

So here I am still longing to be somewhere else, somewhere cooler, somewhere I can soak in the view of the mountains and stand under the waterfalls, somewhere that I get goosebumps every time I walk out the door and look around me. Maybe it's just a fairy tail love story, that once I get there the romance will wither away and I will be longing for somewhere else again. It's extremely possible. I have the itchy need for change bones. Growing up, from the age of 10, we moved on average about every year and a half. Actually, except for my childhood home from age 4-10, my first home with my husband was the longest I had lived in one place. Needless to say I have come to enjoy and almost need that clean slate feeling on a regular basis.

But God is telling us we need to stay here, and while I'd almost rather him be telling us to move to Africa I am coating my itches with Cortisone and trying hard to settle in. God has been so faithful over the years to bless us and meet our hearts desires while also keeping us on the path that has taught us so many great life lessons. Because of that I wouldn't change a thing in the past 7 years, except maybe chosen a different DJ for our wedding and kissed my brother while he was sleeping the last time I saw him. So here I am trying to settle in again, hoping this job, for my husband, is a more permanent one and even thinking about buying a house again.

It has been a huge lesson in trust this past year but God has shown us great things come to those who trust in him. And as I finally let go and let myself get comfortable here I find I finally feel at home. I have made great friends and involved myself in things that have made my life so much more enjoyable to the point that leaving here would be hard now. Yes, I am complicated :)

So anyways, what to do about those itchy bones...

One way I have found to console the itch is to decorate, or rather redecorate. If you know me or have ever been to my house more than once, you know things are always changing. Furniture is moved, walls are painted, new things are hung on the walls. I am always trying to find a way to make things more functional or fit my mood better. But most importantly I look to make the biggest impact for the smallest price. We don't have the money to spend on my redecorating the house every time I want to go antique from modern or want to be surrounded by bright instead of natural tones nor would I spend it if we did. Honestly I find I come up with some of my best ideas when given limited resources, like that dinner you make when you look in the cupboard and think you have nothing that everyone thinks is the best thing you've ever made, yeah like that. So here are a few ways I have spruced up my house to make it more functional for our ever changing living with a toddler life and give our home some new life.

Tips to my madness:

1. Garage sales, garage sales, garage sales. I can't tell you how many things I have gotten for a dollar or two that I repainted or ??? and now could not part without.

2. Dumpster Dive. I don't know about you but people in my neighborhood throw out some awesome things that might need a drawer fixed or a sanding or just a new purpose. Using things you find in nature works great too. I have some great stones and sea glass I have collected as well as unique pieces of wood or bark that have a great story behind them as well.

3. Salvage Stores/Antique Stores. This takes a little diligence, patience, and getting to know your area but we have a few places we go to somewhat regularly that we have gotten some amazing deals at. Ask what they have in the back that may still need to be cleaned up before put on the floor or has a messed up drawer. We have found some amazing treasures that nobody else even noticed.

4. Ask your friends and family. If they know you are in the market they might call you before throwing something out. While as a designer I would love to go to Sherwin Williams and buy the exact color of paint I want it gets pretty expensive. So I often do a shout-out asking if anyone has any left over paints etc.. .tho I must admit some of my walls are only half painted. If I prioritized it I could go back and get the same color- still saving money, to finish the job.

5. Buy what's on sale. The only things I spend good money on are the big ticket items like hutches and dressers and tables or maybe the perfect rug, tho quite a few of those we've gotten for free from people too. Everything else is off the clearance or oops rack.

6. Use what you have. This is the most important one. It helps if you are the creative type like me with a bin full of paper and ribbons and .... well it's kinda like the Barney Bag. But when you can use what you already have in a different way you can't loose.


Here is a Big impact of color with no paint. Old frames my mom gave me that I have repainted a dozen times and filled with fabric (easy to change out too). The Leaf explosion is just Colored Card stock paper cut into leaf shapes and taped to the wall.


Got these simple frames at a garage sale for $3 for the pair. Took out the pictures inside and made my own quirky stick figure drawings. 


Ok one more example for today... I used large pieces of matte board I had laying around and painted the trees on them and just nailed them up. We also found an old roll of piano tape (a lullaby) on vacation, you know the kind they put in automatic pianos, at an antique store for $5 and I put it up behind the picture frames, which were all random finds or gifts (Ross is a great place for cheap frames). [hint if the frame doesn't have a wall hook on the back- take a ribbon and a few flat thumb tacks and make a string to hang from] The book shelf is a top to a hutch that we found at one of our favorite antique stores for $30 and had been painted a mustard color and the bed is an IKEA craigslist find for $60 including mattress and mattress cover.


Hope you got a few good tips to help you liven up your home. Until next time.....


Tuesday, August 7, 2012

Okay Okay Okay... I got it!

Seriously.. why do I ignore advice from other people, why do I consistently second guess my instincts, and pretend I don't hear that little voice in side of me? Well actually I know why... it's cause I am LAZY.

Well not really lazy... seeing as I collapse on the floor in exhaustion every night after giving my son his bath, but if it ads more work to my life I am the first one to try and find a way around it. I like things simple and my husband likes things simple, so the minute things start to get complicated or off our pretty little schedule I start to stress. Why you say.. because it won't be as easy.. yeah that sounds ridiculous now that I write it. LOL

I think to the days before we were parents. The days we worked what seemed all the time and vegged on the sofa the rest of it. We would do nothing and go no where. If by chance we happened to make it out the door with a fun itinerary ahead of us, we'd 99.9% of the time cut it short after dinner and head home because we were TIRED. There is no sense regretting the past but I am learning to take better advantage of the time I have with people, better advantage of my body and mind while they are still in their prime, better advantage of what the world has to offer. It's not easy to let go of who you were, to push your boundaries or to even stay motivated, and there are days I fall so short I can't even recognize where I am, but I'm trying and that's what matters.

So all ramblings aside I am FINALLY starting a blog. I hope through my many interests and passions you can take a little inspiration for your life. Keep checking back here for Design Ideas, creative projects, recipes, nutritional blurbs, words of encouragement or anything else I find interesting.